Nov 30, 2014

Manipulation of index in Oracle

Create table for testing
DROP TABLE "ATWLAM"."TABLE1";
CREATE TABLE "ATWLAM"."TABLE1" AS SELECT * FROM USER_OBJECTS;

Create Index
CREATE INDEX "ATWLAM"."I_TEST1" ON "ATWLAM"."TABLE1" ("OBJECT_ID") TABLESPACE "ATWLAM_INDEX";

Rebuild Index
ALTER INDEX "ATWLAM"."I_TEST1" REBUILD ONLINE;

Shell script to run rman backup in oracle

#!/bin/sh
export ORACLE_SID=orcl
export ORACLE_HOME=/u01/app/oracle/product/11.2.0/dbhome_1
export ORACLE_BASE=/u01/app/oracle


rman target / << EOF
run {
    # configure retention policy to recovery window of 2 days;
    configure retention policy to redundancy 1;
    configure controlfile autobackup on;

    # crosscheck backup pieces
    crosscheck backup;
    crosscheck archivelog all;

    # delete expired backups
    delete noprompt expired backup;
    delete noprompt expired archivelog all;

    # backup database, archivelog, controlfile
    backup database plus archivelog;

    # verify database, archivelog, controlfile, and spfile
    restore database validate;
    restore archivelog all validate;
    restore controlfile validate;
    restore spfile validate;

    # force cleanup
    delete noprompt obsolete device type disk;

}
EOF

exit 0

Import and export in Oracle (imp/exp, impdp/expdp)

Create table for testing
create table atwlam.table1 as select * from user_objects;

Traditional import/export (network based)
-- import
exp userid=atwlam/password@orcl owner=atwlam file=/tmp/atwlam.exp log=/tmp/atwlam.log

-- export
imp userid=atwlam/password@orcl owner=atwlam file=/tmp/atwlam.exp log=/tmp/atwlam.log


Data Pump import export (host based)
-- create directory object
create or replace directory dump_dir as '/tmp';
grant read, write on directory dump_dir to atwlam;

-- data pump import
expdp atwlam/password@orcl schemas=atwlam directory=dump_dir dumpfile=atwlam.expdp logfile=atwlam.log

-- data pump export
impdp atwlam/password@orcl schemas=atwlam directory=dump_dir dumpfile=atwlam.expdp logfile=atwlam.log

Nov 29, 2014

Create a new schema (user, tablespace) in Oracle

------------------------------------------------------------------------
-- create tablespace
create smallfile tablespace atwlam_data
datafile '/u01/app/oracle/oradata/orcl/atwlam_data_1.dbf'
size 100m
autoextend on
next 10m
maxsize unlimited
logging
extent management local
segment space management auto;

-- resize a datafile
alter database datafile '/u01/app/oracle/oradata/orcl/atwlam_data_1.dbf' resize 200m

-- check tablespace status
select file_name, tablespace_name, (bytes/1024) size
from dba_data_files ;

------------------------------------------------------------------------

-- remove existing user and roles
drop user atwlam cascade;
drop user atwlam_user cascade;
drop role atwlam_rw;
drop role atwlam_ro;

-- create schema owner
create user atwlam identified by password
default tablespace atwlam_data
temporary tablespace temp
quota unlimited on atwlam_data
quota unlimited on atwlam_index;
grant connect, resource to atwlam;
alter user atwlam default role all

-- create application user.
create user atwlam_user identified by password
default tablespace atwlam_data
temporary tablespace temp;
grant connect to atwlam_user;
grant create table to atwlam_user;
grant create view to atwlam_user;
grant create any trigger to atwlam_user;
grant create any procedure to atwlam_user;
grant create sequence to atwlam_user;
grant create synonym to atwlam_user;

------------------------------------------------------------------------

-- create schema roles
create role atwlam_rw;
create role atwlam_ro;

grant atwlam_rw to atwlam_user;

-- create table
conn atwlam/password

create table test_tab (
id number,
description varchar2(50),
constraint test_tab_pk primary key (id)
);

-- grant table access to roles
grant select on test_tab to atwlam_ro;
grant select, insert, update, delete on test_tab to atwlam_rw;

-- create synonym from application user
sql> conn atwlam_user/password

create synonym test_tab for atwlam.test_tab;

------------------------------------------------------------------------

-- change default profile
alter profile default
limit
password_life_time unlimited
password_grace_time unlimited
password_lock_time unlimited
failed_login_attempts unlimited;


Using iSCSI Initiator on Centos 6

Install iSCSI initiator packages
yum install iscsi-initiator-utils
/etc/init.d/iscsid start
/etc/init.d/iscsi start
chkconfig iscsid on
chkconfig iscsi on

Edit iSCSI initiator config
cat << EOF >> /etc/iscsi/iscsid.conf
node.session.auth.username = USERNAME
node.session.auth.password = PASSWORD
discovery.sendtargets.auth.username = USERNAME
discovery.sendtargets.auth.password = PASSWORD
EOF

Discover iSCSI targets on network
iscsiadm --mode discovery --type sendtargets --portal 192.168.4.200:3260
iscsiadm -m discovery -t sendtargets -p 192.168.4.200:3260

Login to the iSCSI target
iscsiadm --mode node  --targetname iqn.2014-11.lan.puppet:san.target1 --login
iscsiadm -m node  -t iqn.2014-11.lan.puppet:san.target1 -l

Utilize the new disk
fdisk -l
fdisk /dev/sdc

Logout of the iSCSI target
iscsiadm --mode node  --targetname iqn.2014-11.lan.puppet:san.target1 --logout
iscsiadm -m node  -t iqn.2014-11.lan.puppet:san.target1 -u

Nov 19, 2014

Finding out command line parameters to a linux kernel module (modinfo)

Command line: 
  modinfo bonding

Output: 
  filename:       /lib/modules/2.6.32-400.36.4.el5uek/kernel/drivers/net/bonding/bonding.ko
  author:         Thomas Davis, tadavis@lbl.gov and many others
  description:    Ethernet Channel Bonding Driver, v3.6.0
  version:        3.6.0
  license:        GPL
  srcversion:     765520422A582FCDBFBC802
  depends:        ipv6
  vermagic:       2.6.32-400.36.4.el5uek SMP mod_unload modversions
  parm:           max_bonds:Max number of bonded devices (int)
  parm:           tx_queues:Max number of transmit queues (default = 16) (int)
  parm:           num_grat_arp:Number of gratuitous ARP packets to send on failover event (int)
  parm:           num_unsol_na:Number of unsolicited IPv6 Neighbor Advertisements packets to send on failover event (int)
  parm:           miimon:Link check interval in milliseconds (int)
  parm:           updelay:Delay before considering link up, in milliseconds (int)
  parm:           downdelay:Delay before considering link down, in milliseconds (int)
  parm:           use_carrier:Use netif_carrier_ok (vs MII ioctls) in miimon; 0 for off, 1 for on (default) (int)
  parm:           mode:Mode of operation : 0 for balance-rr, 1 for active-backup, 2 for balance-xor, 3 for broadcast, 4 for 802.3ad, 5 for balance-tlb, 6 for balance-alb (charp)
  parm:           primary:Primary network device to use (charp)
  parm:           primary_reselect:Reselect primary slave once it comes up; 0 for always (default), 1 for only if speed of primary is better, 2 for only on active slave failure (charp)
  parm:           lacp_rate:LACPDU tx rate to request from 802.3ad partner (slow/fast) (charp)
  parm:           ad_select:803.ad aggregation selection logic: stable (0, default), bandwidth (1), count (2) (charp)
  parm:           xmit_hash_policy:XOR hashing method: 0 for layer 2 (default), 1 for layer 3+4 (charp)
  parm:           arp_interval:arp interval in milliseconds (int)
  parm:           arp_ip_target:arp targets in n.n.n.n form (array of charp)
  parm:           arp_validate:validate src/dst of ARP probes: none (default), active, backup or all (charp)
  parm:           fail_over_mac:For active-backup, do not set all slaves to the same MAC.  none (default), active or follow (charp)
  parm:           all_slaves_active:Keep all frames received on an interfaceby setting active flag for all slaves.  0 for never (default), 1 for always. (int)
  parm:           resend_igmp:Number of IGMP membership reports to send on link failure (int)

Failed to get connection to session: Failed to connect to socket /tmp/dbus: Connection refused (virt-manager)

Problem: 
  virt-manager cannot be started after fresh install due to a bug on dbus.

Fix, recreate machine id: 
  dbus-uuidgen > /var/lib/dbus/machine-id

Ref: 
  http://bugs.centos.org/view.php?id=5334
  https://bugzilla.redhat.com/show_bug.cgi?id=598200
  http://nutanix.blogspot.com/2013/06/kvm-virt-manager-startup-failure.html
 

Nov 18, 2014

Interactive on RHEL / Centos 7 (grub2)

Edit boot entry
  At boot menu, press "e" to edit a boot entry, go to the line beginning with "linux".

Add "systemd.confirm_spawn=1", remove "rhgb quiet"
  linux16 /vmlinuz-3.10.0-123.9.3.el7.x86_64 root=/dev/mapper/ol-root ro crashkernel=auto vconsole.font=latarcyrheb-sun16 rd.lvm.lv=ol/swap rd.lvm.lv=ol/root vconsole.keymap=us rhgb quiet LANG=en_US.UTF-8 systemd.confirm_spawn=1

Continue to boot up linux
  Press ctrl-x to continue the boot process. The system will now ask interactively which services are to be started.

Create, list, and extract archives under Linux (tar, star, gzip, bzip2)

Create Archive: 
  tar -cvf tmp.tar tmp
  star -c -f=tmp.star tmp

Create Archive, and with compression: 
  tar -cvf - tmp | gzip > tmp.tar.gz
  star -c tmp | bzip2 > tmp.star.bz2

List Archive: 
  star -t -f=tmp.star
  tar -tvf tmp.tar

List Archive, and with compression: 
  gzip -cd tmp.star.gz | star -t
  bzip2 -cd tmp.tar.bz2 | tar -tvf -

Extract Archive: 
  tar -xvf tmp.tar
  star -x -f=tmp.star

Extract Archive, and with compression: 
  gzip -cd tmp.tar.gz  | tar -xvf  -
  bzip2 -cd tmp.star.bz2 | star -x

Nov 14, 2014

GitHub: setup new account, create repo, sync from linux

Create an account on GitHub
   https://github.com/join

Add an SSH key
   https://help.github.com/articles/generating-ssh-keys/

Create new repo
  https://help.github.com/articles/create-a-repo/

Install git client on linux
  yum -y install git-core

Setup username and email
  git config --global user.name 'biggie'
  git config --global user.email 'void@space.null'

Clone the new repo
  git clone git@github.com:biggie/juicy.git /tmp/juicy

Add modified files
  (some changes)
  git add .

Commit changes to local repo
  git commit -m 'Tell me what happened'

Push changes back to GitHub
  git push

Verify change logs
  git log

Nov 13, 2014

Grub: Windows multi boot, mutually exclusive partitions

Suppose we have this filesystem layout:

  (hd0,0) - Centos 6
  (hd0,1) - Windows Server 2003
  (hd0,2) - Windows Server 2003
  (hd0,3) - Windows Server 2012

In /etc/grub.conf, insert or update the following boot entries for windows (centos is already present):

  title windows 2003 (hd0,1)
    unhide (hd0,1)
    hide (hd0,2)
    hide (hd0,3)
    rootnoverify (hd0,1)
    chainloader +1
    makeactive

  title windows 2008 (hd0,2)
    hide (hd0,1)
    unhide (hd0,2)
    hide (hd0,3)
    rootnoverify (hd0,2)
    chainloader +1
    makeactive

  title windows 2012 (hd0,3)
    hide (hd0,1)
    hide (hd0,2)
    unhide (hd0,3)
    rootnoverify (hd0,3)
    chainloader +1
    makeactive

When any one windows boots up, all other windows partitions will be hidden, and therefore be protected from any unwanted modifications.

Nov 11, 2014

Puppet Module: adding cron jobs, software packages, services

Node configuration (Default, and Individual node)
# site.pp

Package {
  allow_virtual => true,
}

# Install update job and ntp to all nodes
node default {
  include apps::update
  include apps::ntp
}

# Install tomcat6 and httpd to tomcat1.lan
node 'tomcat1.lan' {
  include apps::ntp
  include apps::update
  include apps::tomcat6
  include apps::httpd
}

Module and Class Configuration
# apps/init.pp

# Cron jobs for OS and puppet update.
class apps::update {
  cron { yum-update:
    command => "/usr/bin/yum -y update",
    user    => root,
    minute  => "*/5"
  }

  cron { puppet-update:
    command => "/usr/bin/puppet agent --test",
    user    => root,
    minute  => "*/5"
  }
}

# Auto install, and auto start-up
class apps::ntp {
  package { 'ntp': ensure => installed }

  service { "ntpd":
    ensure => running,
    enable => true,
    subscribe => Package["ntp"]
  }
}

class apps::httpd {
  package { 'httpd': ensure => installed }

  service { "httpd":
    ensure => running,
    enable => true,
    pattern => "httpd",
    subscribe => Package["httpd"]
  }

}

# Same as above, resolved package dependencies.
class apps::tomcat6 {
  package { 'tomcat6': ensure => installed }
  package { 'glibc-headers': ensure => installed }
  package { 'kernel-headers': ensure => installed }

  Package['kernel-headers'] -> Package['glibc-headers'] -> Package['tomcat6']

  service { "tomcat6":
    ensure => running,
    enable => true,
    pattern => "tomcat6",
    subscribe => Package["tomcat6"]
  }

}

Nov 10, 2014

Install puppet on centos linux 6

Install puppet yum repo
rpm -ivh https://yum.puppetlabs.com/el/6.5/products/x86_64/puppetlabs-release-6-10.noarch.rpm
rpm -ivh https://yum.puppetlabs.com/el/7/products/x86_64/puppetlabs-release-7-10.noarch.rpm

Install Puppet Client
yum -y install puppet
chkconfig puppet on
service puppet restart

Install Puppet Master
yum -y install puppet-server
chkconfig puppetmaster on
service puppetmaster restart

Setup Firewall Exception
iptables -I INPUT 4 -m state --state NEW -m tcp -p tcp --dport 8140 -j ACCEPT
service iptables save
service iptables restart

Request a New Certificate (on Client)
puppet agent --ca_server puppet1.lan

Sign the Certificate Request (on Server)
puppet ca sign tomcat1.lan

Setup Puppet Master Location (on Client)
echo "server = puppet1.lan" >> /etc/puppet/puppet.conf
service puppet restart

Install First Manifest (on Server)
cat << EOF > /etc/puppet/manifests/site.pp
# site.pp
    cron { yum-update:
      command => "/usr/bin/yum -y update",
      user    => root,
      minute  => "*/1"
    }
EOF

Validate Syntax of Manifest (on Server)
puppet parser validate /etc/puppet/manifests/site.pp

Pull, and Apply Manifest (on Client)
puppet agent  --verbose –test

Nov 4, 2014

Trigger an alert from windows eventlog, with event text as message

Step-1: Create a Job which will trigger on an Event during specific condition


Step-2: Right Click on the job and Export it, save it as test.xml

Step-3: Open test.xml File in notepad to Edit, Find (Event Trigger)

Step-4: Include ValueQueries as shown below, save the file. In below example, I have added (Event/EventData/Data) as (EventData) which will be used as $EventData while sending a mail.
Tip:
You can include any values in the event (Example: Event/System/Computer will include your Server Name). You can open the event -> Go to Details Tab -> Select XML view to see more details:

Step-5:
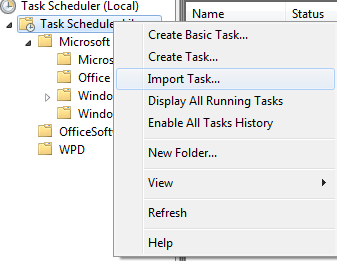
Delete the existing task and import the new task using modified XML file.


Step-6:
Edit Actions -> Send an e-mail option, include $(EventData) as appropriate