Feb 9, 2015

Add Domain Users as Local Sudoers (Linux, Samba, Winbind)

My first thought was to add the domain user to the wheel group:

usermod -a -G wheel corpdev\\atwlam

Though it is possible to add domain user to wheel, the user is still unable to sudo.

CORPDEV\atwlam@sles12:~> sudo su -

We trust you have received the usual lecture from the local System
Administrator. It usually boils down to these three things:

#1) Respect the privacy of others.
#2) Think before you type.
#3) With great power comes great responsibility.

root's password:

So the second option would be to add the domain user (or group, e.g. %corpdev\\linux_admins, note the double backslashes) to sudoers:

# visudo

%wheel ALL=(ALL) NOPASSWD: ALL
%corpdev\\linux_admins ALL=(ALL) NOPASSWD: ALL

And there you go, the domain user can now use sudo:

CORPDEV\atwlam@sles12:~> sudo su -
sles12:~ #

Jan 13, 2015

Bitmap index exclusive lock on table (oracle database)

Updating table with bitmap index creates an exclusive lock on table. But only happens in the scope of the same cardinality.

E.g. insert of "Y" and "N" into a bitmap index column can happen independently, but insert "N" and "N" in different session would create a deadlock.

-- create table t
create table t (processed_flag varchar2 (1));

-- create bitmap index on tcreate bitmap index t_idx on t (processed_flag);

set pagesize 5000;
set linesize 200;
col username format a10
col owner format a10
col object_name format a20
col machine format a20

-- view locking sessions
select t2.username, t3.owner, t3.object_name, t2.machine, t2.sid as sid, t2.serial#, t2.last_call_et, t2.program, t1.locked_mode from v$locked_object t1, v$session t2, dba_objects t3 where t1.session_id = t2.sid and t1.object_id = t3.object_id order by t2.logon_time;

-- 202, 75

-- view event of waiting locked session
select sid, event from v$session_wait where sid = 202;
select sid, event from v$session_wait where sid = 75;

-- view statement of current lock session
select /* + NO_MERGE (a) NO_MERGE (b) NO_MERGE (c) */ a.username, a.machine, a.sid, a.serial#, a.last_call_et "Seconds", b.id1, c.sql_text "SQL" from v$session a, v$lock b, v$sqltext c where a.username is not null and a.lockwait = b.kaddr and c.hash_value = a.sql_hash_value;

Nov 30, 2014

Manipulation of index in Oracle

Create table for testing
DROP TABLE "ATWLAM"."TABLE1";
CREATE TABLE "ATWLAM"."TABLE1" AS SELECT * FROM USER_OBJECTS;

Create Index
CREATE INDEX "ATWLAM"."I_TEST1" ON "ATWLAM"."TABLE1" ("OBJECT_ID") TABLESPACE "ATWLAM_INDEX";

Rebuild Index
ALTER INDEX "ATWLAM"."I_TEST1" REBUILD ONLINE;

Shell script to run rman backup in oracle

#!/bin/sh
export ORACLE_SID=orcl
export ORACLE_HOME=/u01/app/oracle/product/11.2.0/dbhome_1
export ORACLE_BASE=/u01/app/oracle


rman target / << EOF
run {
    # configure retention policy to recovery window of 2 days;
    configure retention policy to redundancy 1;
    configure controlfile autobackup on;

    # crosscheck backup pieces
    crosscheck backup;
    crosscheck archivelog all;

    # delete expired backups
    delete noprompt expired backup;
    delete noprompt expired archivelog all;

    # backup database, archivelog, controlfile
    backup database plus archivelog;

    # verify database, archivelog, controlfile, and spfile
    restore database validate;
    restore archivelog all validate;
    restore controlfile validate;
    restore spfile validate;

    # force cleanup
    delete noprompt obsolete device type disk;

}
EOF

exit 0

Import and export in Oracle (imp/exp, impdp/expdp)

Create table for testing
create table atwlam.table1 as select * from user_objects;

Traditional import/export (network based)
-- import
exp userid=atwlam/password@orcl owner=atwlam file=/tmp/atwlam.exp log=/tmp/atwlam.log

-- export
imp userid=atwlam/password@orcl owner=atwlam file=/tmp/atwlam.exp log=/tmp/atwlam.log


Data Pump import export (host based)
-- create directory object
create or replace directory dump_dir as '/tmp';
grant read, write on directory dump_dir to atwlam;

-- data pump import
expdp atwlam/password@orcl schemas=atwlam directory=dump_dir dumpfile=atwlam.expdp logfile=atwlam.log

-- data pump export
impdp atwlam/password@orcl schemas=atwlam directory=dump_dir dumpfile=atwlam.expdp logfile=atwlam.log

Nov 29, 2014

Create a new schema (user, tablespace) in Oracle

------------------------------------------------------------------------
-- create tablespace
create smallfile tablespace atwlam_data
datafile '/u01/app/oracle/oradata/orcl/atwlam_data_1.dbf'
size 100m
autoextend on
next 10m
maxsize unlimited
logging
extent management local
segment space management auto;

-- resize a datafile
alter database datafile '/u01/app/oracle/oradata/orcl/atwlam_data_1.dbf' resize 200m

-- check tablespace status
select file_name, tablespace_name, (bytes/1024) size
from dba_data_files ;

------------------------------------------------------------------------

-- remove existing user and roles
drop user atwlam cascade;
drop user atwlam_user cascade;
drop role atwlam_rw;
drop role atwlam_ro;

-- create schema owner
create user atwlam identified by password
default tablespace atwlam_data
temporary tablespace temp
quota unlimited on atwlam_data
quota unlimited on atwlam_index;
grant connect, resource to atwlam;
alter user atwlam default role all

-- create application user.
create user atwlam_user identified by password
default tablespace atwlam_data
temporary tablespace temp;
grant connect to atwlam_user;
grant create table to atwlam_user;
grant create view to atwlam_user;
grant create any trigger to atwlam_user;
grant create any procedure to atwlam_user;
grant create sequence to atwlam_user;
grant create synonym to atwlam_user;

------------------------------------------------------------------------

-- create schema roles
create role atwlam_rw;
create role atwlam_ro;

grant atwlam_rw to atwlam_user;

-- create table
conn atwlam/password

create table test_tab (
id number,
description varchar2(50),
constraint test_tab_pk primary key (id)
);

-- grant table access to roles
grant select on test_tab to atwlam_ro;
grant select, insert, update, delete on test_tab to atwlam_rw;

-- create synonym from application user
sql> conn atwlam_user/password

create synonym test_tab for atwlam.test_tab;

------------------------------------------------------------------------

-- change default profile
alter profile default
limit
password_life_time unlimited
password_grace_time unlimited
password_lock_time unlimited
failed_login_attempts unlimited;


Using iSCSI Initiator on Centos 6

Install iSCSI initiator packages
yum install iscsi-initiator-utils
/etc/init.d/iscsid start
/etc/init.d/iscsi start
chkconfig iscsid on
chkconfig iscsi on

Edit iSCSI initiator config
cat << EOF >> /etc/iscsi/iscsid.conf
node.session.auth.username = USERNAME
node.session.auth.password = PASSWORD
discovery.sendtargets.auth.username = USERNAME
discovery.sendtargets.auth.password = PASSWORD
EOF

Discover iSCSI targets on network
iscsiadm --mode discovery --type sendtargets --portal 192.168.4.200:3260
iscsiadm -m discovery -t sendtargets -p 192.168.4.200:3260

Login to the iSCSI target
iscsiadm --mode node  --targetname iqn.2014-11.lan.puppet:san.target1 --login
iscsiadm -m node  -t iqn.2014-11.lan.puppet:san.target1 -l

Utilize the new disk
fdisk -l
fdisk /dev/sdc

Logout of the iSCSI target
iscsiadm --mode node  --targetname iqn.2014-11.lan.puppet:san.target1 --logout
iscsiadm -m node  -t iqn.2014-11.lan.puppet:san.target1 -u

Nov 19, 2014

Finding out command line parameters to a linux kernel module (modinfo)

Command line: 
  modinfo bonding

Output: 
  filename:       /lib/modules/2.6.32-400.36.4.el5uek/kernel/drivers/net/bonding/bonding.ko
  author:         Thomas Davis, tadavis@lbl.gov and many others
  description:    Ethernet Channel Bonding Driver, v3.6.0
  version:        3.6.0
  license:        GPL
  srcversion:     765520422A582FCDBFBC802
  depends:        ipv6
  vermagic:       2.6.32-400.36.4.el5uek SMP mod_unload modversions
  parm:           max_bonds:Max number of bonded devices (int)
  parm:           tx_queues:Max number of transmit queues (default = 16) (int)
  parm:           num_grat_arp:Number of gratuitous ARP packets to send on failover event (int)
  parm:           num_unsol_na:Number of unsolicited IPv6 Neighbor Advertisements packets to send on failover event (int)
  parm:           miimon:Link check interval in milliseconds (int)
  parm:           updelay:Delay before considering link up, in milliseconds (int)
  parm:           downdelay:Delay before considering link down, in milliseconds (int)
  parm:           use_carrier:Use netif_carrier_ok (vs MII ioctls) in miimon; 0 for off, 1 for on (default) (int)
  parm:           mode:Mode of operation : 0 for balance-rr, 1 for active-backup, 2 for balance-xor, 3 for broadcast, 4 for 802.3ad, 5 for balance-tlb, 6 for balance-alb (charp)
  parm:           primary:Primary network device to use (charp)
  parm:           primary_reselect:Reselect primary slave once it comes up; 0 for always (default), 1 for only if speed of primary is better, 2 for only on active slave failure (charp)
  parm:           lacp_rate:LACPDU tx rate to request from 802.3ad partner (slow/fast) (charp)
  parm:           ad_select:803.ad aggregation selection logic: stable (0, default), bandwidth (1), count (2) (charp)
  parm:           xmit_hash_policy:XOR hashing method: 0 for layer 2 (default), 1 for layer 3+4 (charp)
  parm:           arp_interval:arp interval in milliseconds (int)
  parm:           arp_ip_target:arp targets in n.n.n.n form (array of charp)
  parm:           arp_validate:validate src/dst of ARP probes: none (default), active, backup or all (charp)
  parm:           fail_over_mac:For active-backup, do not set all slaves to the same MAC.  none (default), active or follow (charp)
  parm:           all_slaves_active:Keep all frames received on an interfaceby setting active flag for all slaves.  0 for never (default), 1 for always. (int)
  parm:           resend_igmp:Number of IGMP membership reports to send on link failure (int)

Failed to get connection to session: Failed to connect to socket /tmp/dbus: Connection refused (virt-manager)

Problem: 
  virt-manager cannot be started after fresh install due to a bug on dbus.

Fix, recreate machine id: 
  dbus-uuidgen > /var/lib/dbus/machine-id

Ref: 
  http://bugs.centos.org/view.php?id=5334
  https://bugzilla.redhat.com/show_bug.cgi?id=598200
  http://nutanix.blogspot.com/2013/06/kvm-virt-manager-startup-failure.html
 

Nov 18, 2014

Interactive on RHEL / Centos 7 (grub2)

Edit boot entry
  At boot menu, press "e" to edit a boot entry, go to the line beginning with "linux".

Add "systemd.confirm_spawn=1", remove "rhgb quiet"
  linux16 /vmlinuz-3.10.0-123.9.3.el7.x86_64 root=/dev/mapper/ol-root ro crashkernel=auto vconsole.font=latarcyrheb-sun16 rd.lvm.lv=ol/swap rd.lvm.lv=ol/root vconsole.keymap=us rhgb quiet LANG=en_US.UTF-8 systemd.confirm_spawn=1

Continue to boot up linux
  Press ctrl-x to continue the boot process. The system will now ask interactively which services are to be started.

Create, list, and extract archives under Linux (tar, star, gzip, bzip2)

Create Archive: 
  tar -cvf tmp.tar tmp
  star -c -f=tmp.star tmp

Create Archive, and with compression: 
  tar -cvf - tmp | gzip > tmp.tar.gz
  star -c tmp | bzip2 > tmp.star.bz2

List Archive: 
  star -t -f=tmp.star
  tar -tvf tmp.tar

List Archive, and with compression: 
  gzip -cd tmp.star.gz | star -t
  bzip2 -cd tmp.tar.bz2 | tar -tvf -

Extract Archive: 
  tar -xvf tmp.tar
  star -x -f=tmp.star

Extract Archive, and with compression: 
  gzip -cd tmp.tar.gz  | tar -xvf  -
  bzip2 -cd tmp.star.bz2 | star -x

Nov 14, 2014

GitHub: setup new account, create repo, sync from linux

Create an account on GitHub
   https://github.com/join

Add an SSH key
   https://help.github.com/articles/generating-ssh-keys/

Create new repo
  https://help.github.com/articles/create-a-repo/

Install git client on linux
  yum -y install git-core

Setup username and email
  git config --global user.name 'biggie'
  git config --global user.email 'void@space.null'

Clone the new repo
  git clone git@github.com:biggie/juicy.git /tmp/juicy

Add modified files
  (some changes)
  git add .

Commit changes to local repo
  git commit -m 'Tell me what happened'

Push changes back to GitHub
  git push

Verify change logs
  git log

Nov 13, 2014

Grub: Windows multi boot, mutually exclusive partitions

Suppose we have this filesystem layout:

  (hd0,0) - Centos 6
  (hd0,1) - Windows Server 2003
  (hd0,2) - Windows Server 2003
  (hd0,3) - Windows Server 2012

In /etc/grub.conf, insert or update the following boot entries for windows (centos is already present):

  title windows 2003 (hd0,1)
    unhide (hd0,1)
    hide (hd0,2)
    hide (hd0,3)
    rootnoverify (hd0,1)
    chainloader +1
    makeactive

  title windows 2008 (hd0,2)
    hide (hd0,1)
    unhide (hd0,2)
    hide (hd0,3)
    rootnoverify (hd0,2)
    chainloader +1
    makeactive

  title windows 2012 (hd0,3)
    hide (hd0,1)
    hide (hd0,2)
    unhide (hd0,3)
    rootnoverify (hd0,3)
    chainloader +1
    makeactive

When any one windows boots up, all other windows partitions will be hidden, and therefore be protected from any unwanted modifications.

Nov 11, 2014

Puppet Module: adding cron jobs, software packages, services

Node configuration (Default, and Individual node)
# site.pp

Package {
  allow_virtual => true,
}

# Install update job and ntp to all nodes
node default {
  include apps::update
  include apps::ntp
}

# Install tomcat6 and httpd to tomcat1.lan
node 'tomcat1.lan' {
  include apps::ntp
  include apps::update
  include apps::tomcat6
  include apps::httpd
}

Module and Class Configuration
# apps/init.pp

# Cron jobs for OS and puppet update.
class apps::update {
  cron { yum-update:
    command => "/usr/bin/yum -y update",
    user    => root,
    minute  => "*/5"
  }

  cron { puppet-update:
    command => "/usr/bin/puppet agent --test",
    user    => root,
    minute  => "*/5"
  }
}

# Auto install, and auto start-up
class apps::ntp {
  package { 'ntp': ensure => installed }

  service { "ntpd":
    ensure => running,
    enable => true,
    subscribe => Package["ntp"]
  }
}

class apps::httpd {
  package { 'httpd': ensure => installed }

  service { "httpd":
    ensure => running,
    enable => true,
    pattern => "httpd",
    subscribe => Package["httpd"]
  }

}

# Same as above, resolved package dependencies.
class apps::tomcat6 {
  package { 'tomcat6': ensure => installed }
  package { 'glibc-headers': ensure => installed }
  package { 'kernel-headers': ensure => installed }

  Package['kernel-headers'] -> Package['glibc-headers'] -> Package['tomcat6']

  service { "tomcat6":
    ensure => running,
    enable => true,
    pattern => "tomcat6",
    subscribe => Package["tomcat6"]
  }

}

Nov 10, 2014

Install puppet on centos linux 6

Install puppet yum repo
rpm -ivh https://yum.puppetlabs.com/el/6.5/products/x86_64/puppetlabs-release-6-10.noarch.rpm
rpm -ivh https://yum.puppetlabs.com/el/7/products/x86_64/puppetlabs-release-7-10.noarch.rpm

Install Puppet Client
yum -y install puppet
chkconfig puppet on
service puppet restart

Install Puppet Master
yum -y install puppet-server
chkconfig puppetmaster on
service puppetmaster restart

Setup Firewall Exception
iptables -I INPUT 4 -m state --state NEW -m tcp -p tcp --dport 8140 -j ACCEPT
service iptables save
service iptables restart

Request a New Certificate (on Client)
puppet agent --ca_server puppet1.lan

Sign the Certificate Request (on Server)
puppet ca sign tomcat1.lan

Setup Puppet Master Location (on Client)
echo "server = puppet1.lan" >> /etc/puppet/puppet.conf
service puppet restart

Install First Manifest (on Server)
cat << EOF > /etc/puppet/manifests/site.pp
# site.pp
    cron { yum-update:
      command => "/usr/bin/yum -y update",
      user    => root,
      minute  => "*/1"
    }
EOF

Validate Syntax of Manifest (on Server)
puppet parser validate /etc/puppet/manifests/site.pp

Pull, and Apply Manifest (on Client)
puppet agent  --verbose –test

Nov 4, 2014

Trigger an alert from windows eventlog, with event text as message

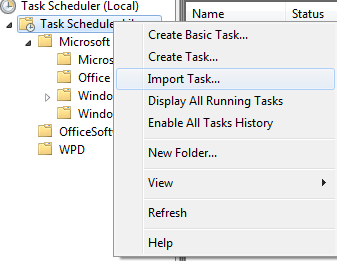
Step-1: Create a Job which will trigger on an Event during specific condition


Step-2: Right Click on the job and Export it, save it as test.xml

Step-3: Open test.xml File in notepad to Edit, Find (Event Trigger)

Step-4: Include ValueQueries as shown below, save the file. In below example, I have added (Event/EventData/Data) as (EventData) which will be used as $EventData while sending a mail.
Tip:
You can include any values in the event (Example: Event/System/Computer will include your Server Name). You can open the event -> Go to Details Tab -> Select XML view to see more details:

Step-5:
Delete the existing task and import the new task using modified XML file.


Step-6:
Edit Actions -> Send an e-mail option, include $(EventData) as appropriate


May 15, 2008

好老師捨身救活四學生

【本報訊】在大地震中,無數的學校被無情的震倒,而一個個老師犧牲了性命救活學生的偉大故事,卻成了今次悲劇中的禮讚。

在德陽市漢旺鎮一間學校任職教導主任的譚千秋老師(50歲),在前日(周二)晚上10時許,救援人員從倒塌校舍的瓦礫中將他的屍體挖掘出來。救援人員說:「我們發現他的時候,他雙臂張開趴在課桌上,身體死死地護着四名學生,四名學生都活下來了。」其中一名獲救高中二女生劉紅麗的舅舅事後說:「他可是個大好人,大英雄呀!」譚老師的妻子撫着丈夫的屍體,替他拭去臉上每一粒沙塵,為他整理蓬亂的頭髮,譚老師的後腦被石頭壓得深凹下去……譚妻哭不成聲:「那天早上他和平常一樣,6點就起來,給我們小女兒洗漱穿戴好,帶着她出去散步,然後早早上班,這一走就再也沒回來了。」

用背擋住水泥板

遵道鎮歡歡幼稚園在地震中完全倒塌,當時有80多名孩子午睡,事件中共有50多名小孩和3名老師死亡,瞿萬容老師是其中一名死者,當時她用背部擋住垮塌的水泥板,懷裏還緊抱着一名小孩。幼稚園校長李娟哭說:「小孩獲救了,但瞿老師就永遠離開了我們。」

Dec 17, 2007

燕尾榫 / Dovetail joint


Dovetail,原由 michaelhallca 上載。

木工榫卯之技法簡介

Dovetail joint on Wikipedia

Antique Boxes in English Society

DoveTail Joints

Sep 8, 2007

養螞蟻的玩意:Antquarium

過去曾在網上見過Antquarium,一看之下覺得非常有趣。早前朋友告知銅鑼灣CitySuper有售,於是立即帶了一盒回家。

話說這玩意由NASA(美國太空總署)發明。NASA當初為了在無重狀態下研究螞蟻的行為,從海藻中提煉出這種包含水、營養和抑菌劑的凝膠代替泥土讓螞蟻居住。凝膠的設計能保護螞蟻在穿梭機升空時不被重力壓扁。凝膠包含的營養和水份亦成為螞蟻的糧食。科學家能更容易從旁觀察螞蟻在透明凝膠中的各種行為。後來這種凝膠在美國被註冊專利,經過商業化成為現在的Antquarium。有興趣知道其成份的話,可以參考其專利說明:Habitat media for ants and other invertebrates

我買的是Forest Ant,是Globus公司將Antquarium和Plantarium結合的產品,讓你可以在一個容器中同時飼養螞蟻和其他植物。時代廣場CitySuper售價盛為港幣128元。

以下是Antquarium的包裝和盒內的配件。

Front Cover
盒子的正面


Back Cover
盒子的背面


Container
透明的容器和藍色凝膠


Aloe Vera & Basil Seeds
種在容器內的植物物子。左邊較大顆的是蘆薈,右邊是羅勒葉


Ant Catcher
捉螞蟻用的容器


Magnifier
觀察螞蟻的放大鏡


Magnifier
放大鏡的效果


Stick
為了在凝膠中放種子,特別配上挖洞的木條。
(噢~多貼心!)


Seeds, Gel Color Tablets, Liquid & Powder
額外配上多一包種子和自製凝膠套裝,讓凝膠用完後可以再玩一次
左上:兩包種子,其中一包供第二次栽種時用
左下:調配凝膠顏色用的顏色藥丸
中間:自製凝膠用的液體
右面:自製凝膠用的粉末


Lid of the container
容器的頂部,蓋子上面有兩個氣孔。
從其他飼養者的經驗得知,較小的螞蟻品種(例如家蟻)可以從氣孔爬走逃。


因為盒內沒有配備螞蟻所以需要自己捕捉。但是說明書提到產品網站上有一種"Turbo Ants"可供訂購,價錢為6歐元15-20隻。從網上搜尋不到這種螞蟻的相關資料,僅有飼養者表示這種蟻有一種快速轉身的特技。

說明書提到容器內的螞蟻在18隻以上25隻以下為最佳狀態。相同種類不同族群的螞蟻不可同放否則會打架。容器的蓋子需要每兩星期打開數分鐘引進新鮮空氣。螞蟻的壽命約有六個月,螞蟻死光後可以掉清掉容器再放新的螞蟻。盒內亦備有自製凝膠套裝,讓你在凝膠用完時可以再玩一次。

現在的階段,先要將蘆薈種子種在1-2cm深的地方內一至兩星期,蘆薈開始發芽後再種羅勒葉種子。最後再做幾個約1寸深的洞,再放入螞蟻,螞蟻就會自己挖通道。暫時仍未找到目標,但因為太小的螞蟻會從氣孔逃走,最終目標身長要在1cm或以上,而且希望是有兵蟻的品種。

延伸閱讀:
螞蟻‧螞蟻──威爾森與霍德伯勒的螞蟻探索之旅

Feb 20, 2007